Uncategorized
EMC VMAX – FAST VP Configuration Via SYMCLI
In this post I will detail how to configure EMC FAST VP (Virtual Provisioning) on a VMAX storage array via SYMCLI, you can also use the “EMC Unisphere for VMAX” […]
Virtualization & Storage

In this post I will detail how to configure EMC FAST VP (Virtual Provisioning) on a VMAX storage array via SYMCLI, you can also use the “EMC Unisphere for VMAX” […]
In this post I will detail how to configure EMC FAST VP (Virtual Provisioning) on a VMAX storage array via SYMCLI, you can also use the “EMC Unisphere for VMAX” user interface which I will cover in a later post.
Please see an excellent post by Sean Cummins on ‘VMAX FASTVP Best Practice Essentials’, this will give you a great insight into how the Pools should be designed and configured in order to implement an optimized FAST VP solution.
Note: FAST VP only performs promotion/demotion activity between tiers defined on differing drive technologies. RAID protection and drive rotational speed are not considered. As a result, a FAST VP policy should not be created where two or more tiers use the same drive type. For example, a FAST VP policy should not contain two or more FC tiers.
Before you start configuring FAST VP all basic storage provisioning should be completed. For example you will need to have created all required Storage Pools, LUNs, and Storage Groups.
Steps Outlined:
1. Creating the Storage Tiers
2. Creating FAST VP Policy
3. Associate Storage Groups with VP Policy
4. Enable FAST VP
5. View FAST VP Details
6. Configuring Time Window Settings
Note: Each ‘Tier Name’ and ‘Policy Name’ may consist of up to 32 alphanumeric characters, underscores (_) and hyphens (-). To a max of 256 Tiers and FAST Policies.
1. Creating the Storage Tiers
The first step is to create the tiers using the ‘symtier’ command. For this example we will create three tiers SATA,FC & EFD:
• SATA TIER:
symtier -sid xxx create -name Tier_SATA_raid6 -tgt_raid6 -tgt_prot 6+2 -technology SATA -vp -pool PoolName-SATA-R66
• FC TIER:
symtier -sid xxx create -name Tier_FC_raid5 -tgt_raid5 -tgt_prot 3+1 -technology FC -vp -pool PoolName -FC-R53
• EFD TIER:
symtier -sid xxx create -name Tier_EFD_raid5 -tgt_raid5 -tgt_prot 3+1 -technology EFD -vp -pool PoolName -EFD-R53
List the created tiers:
symtier -sid xxx list
List the current allocation of storage tiers:
symtier -sid xxx list -vp
Note: Syntax per RAID Configuration
RAID 0 = -tgt_unprotected
RAID 1 = -tgt_raid1
RAID 5 = -tgt_raid5 -tgt_prot 3+1 | 7+1
RAID 6 = -tgt_raid6 -tgt_prot 6+2 | 14+2
2. Creating FAST VP Policy
Next create the FAST VP policy. As part of creating the Policy we will add the tiers and the required Storage Groups to the FAST VP policy.
Create the FAST VP Policy:
symfast -sid xxx -fp create -name POLICY_Name
Next task is to add the tiers created above to the policy and set the percentage usage of each tier allowed. For this example 100% of the Storage Group’s capacity can reside on SATA, 50% On FC and 10% on EFD.
symfast -sid xxx -fp add -tier_name Tier_SATA_raid6 -max_sg_percent 100 -fp_name VP_POLICY
symfast -sid xxx -fp add -tier_name Tier_FC_raid5 -max_sg_percent 50 -fp_name VP_POLICY
symfast -sid xxx -fp add -tier_name Tier_EFD_raid5 -max_sg_percent 10 -fp_name VP_POLICY
List FAST VP Policy:
symfast -sid xxx list –fp -vp
For more detail us the -v switch symfast -sid xxx list –fp -vp -v
3. Associate Storage Groups with VP Policy
Firstly list the Storage Group’s in order to get SG names:
symaccess -sid xxx list -type storage
Secondly Associate SG’s with the FAST POLICY:
symfast -sid xxx associate -sg SG_Name1 -fp_name VP _POLICY -priority 2
symfast -sid xxx associate -sg SG_Name2 -fp_name VP _POLICY -priority 2
To list associations:
symfast -sid xxx list –association
To show a particular SG association details:
symfast -sid xxx show -association –sg SG_Name
To Disassociate a storage group from a FAST policy:
symfast -sid xxx disassociate -sg SG_Name1
4. Enable FAST VP
symfast -sid xxx enable -vp
Set Data Movement to AUTO
symfast -sid xxx set -control_parms -vp_data_move_mode AUTO
5. View FAST VP Details
Show Policy details:
symfast -sid xxx show -fp_name VP_POLICY
List FAST controller state:
symfast -sid xxx list –state
List the FAST controller settings:
symfast -sid xxx list -control_parms
List a Storage Groups Tier location percentage breakdown:
symCFG -sid xxx list -tdev -sg SG_Name -tier
6. Configuring Time Window Settings
The symtw command defines time windows to control FAST VP.
Arguments:

CONFIGURE MOVE TIME WINDOW SETTINGS
The move time window specifies the time at which FAST VP should move data. Create a move time window at the time of day when you expect to have the least amount of traffic on the storage array.
Example Move Time Window Setting:

Firstly issue a command to remove all time windows that may already exist (-inclusive implies Open Time Windows and -exclusive closed):
symtw -sid xxx -inclusive -type move_vp rmall -noprompt
symtw -sid xxx -exclusive -type move_vp rmall -noprompt
Adding a new time window based on the above table:
symtw -sid xxx -inclusive -type move_vp add -days Mon,Tue,Wed,Thu,Fri,Sat,Sun -start_time 22:00 -end_time 24:00 -noprompt
symtw -sid xxx -inclusive -type move_vp add -days Mon,Tue,Wed,Thu,Fri,Sat,Sun -start_time 00:00 -end_time 03:00 -noprompt
List the time window settings configuration:
symtw -sid xxx -inclusive -type move_vp list
symtw -sid xxx -exclusive -type move_vp list

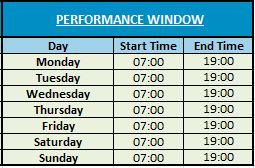
CONFIGURE PERFORMANCE TIME WINDOW SETTINGS
Create a performance time window setting that excludes periods of negligible or low system utilization (such as nights and weekends) from the period during which statistics are collected on the data access pattern.
Example Performance Time Window Setting:
Removes all existing time windows:
symtw -sid xxx -inclusive -type perf rmall -noprompt
symtw -sid xxx -exclusive -type perf rmall -noprompt
Adding a new performance time window based on the above table:
symtw -sid xxx -inclusive -type perf add -days Mon,Tue,Wed,Thu,Fri,Sat,Sun -start_time 07:00 -end_time 19:00 -noprompt
List the performance time window information:
symtw -sid xxx -inclusive -type perf list
symtw -sid xxx -exclusive -type perf list


can you verify the tier creation, i think we have to mention raid type first then need to provide the target.. for ex:
symtier -sid 1234 create -name EFDTier -tgt_raid5 -tgt_prot 3 1 -technology EFD -vp -pool TP0_SSD
Thank you. Yes raid type needs to be to defined.
how do I list the devices on each symtier ?
How to check the Performance of Storage Group after applying the Policy
Excellent Post. Please keep writing more.
Can you please post how to configure a gold and bronze and silver policy