Storage
EMC VMAX3 – CLI Cheat Sheet
Guest post by the VMAX Guru – Paul Martin @rawstorage VMAX3 CLI Cheat Sheet Disclaimer, this is not a comprehensive how to, just a toe in the ocean of VMAX3, […]
Virtualization & Storage

Guest post by the VMAX Guru – Paul Martin @rawstorage VMAX3 CLI Cheat Sheet Disclaimer, this is not a comprehensive how to, just a toe in the ocean of VMAX3, […]
Guest post by the VMAX Guru – Paul Martin @rawstorage
VMAX3 CLI Cheat Sheet
Disclaimer, this is not a comprehensive how to, just a toe in the ocean of VMAX3, there is always more and there is always why. The information here is not a substitute for the product guides which have been consolidated into a single downloadable PDF documentation set please download and refer to the documentation set for full feature descriptions.
Click to access docu59402_Solutions-Enabler-8.0.3-Documentation-Set.pdf
Also see the new features paper for more details on VMAX3 and features in general
Click to access h13578-vmax3-family-new-features-wp.pdf
FAST with SLO
One of the major changes with V3 is the way we provision storage. FAST has been enhanced to work on a more granular level (128KB track level) and we have abstracted a lot of the internals so that the end user need not be so concerned about the mechanics of the array they can simply provision capacity and set a performance expectation which the array will work to achieve.
In VMAX3 FAST is always on and the majority of the configuration is pre-configured, available SLO are dictated by the disks available in the array and Storage Resource Pools are defined in the bin file.
Provisioning storage on a VMAX3 is easier that on previous Symm/VMAX arrays, we are no longer required to create meta devices to support larger devices and the SLO model makes provisioning intuitive and easy. From the command line it’s pretty much a three step process:
1. Create your storage group and assign your SLO and workload (optional), if no SLO or workload is specified FAST will still manage everything but your SLO will be optimized. The storage can represent your applications devices as a whole and can be used in SRDF and Timefinder meaning if you design storage with application==storagegroup snapshot/srdf design becomes simpler later on too. VMAX3 supports 64K storage groups so there is no reason not to configure 1 per app.
symsg –sid 007 create myapp_sg –slo gold –workload oltp
2. Create and add your devices, here I am creating 5 x 2048 GB devices and adding to my storage group. Note I can just create 2048 GB devices, no meta is created. At present we can create devs up to 16TB soon to be increased further.
symconfigure -sid 007 -cmd "create dev count =5 config=tdev, emulation=fba size=2048 GB sg=myapp_sg;" preview
3. Present to the host via a masking view, no change from VMAX here.
symaccess –sid 007 create view –name myapp_mv –sg myapp_sg –pg myapp_pg –ig myapp_ig
Here I will highlight a few of the key commands to gather information about the configuration and interaction with the SRP and SLO.
NOTE:- Monitoring and Alerting of FAST SLO is built into Unisphere for VMAX. SLO compliance is reported at every level when looking at storage group components in Unisphere.
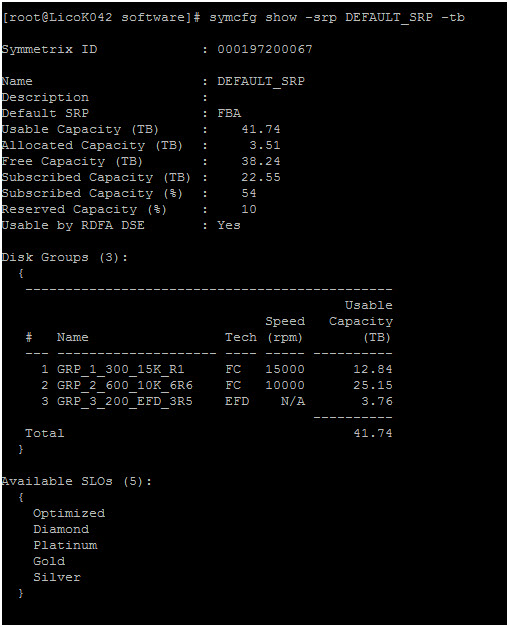
Viewing SRP Configured On The Array
Most VMAX3 arrays will only have a single SRP however it is possible to have multiple, if you are using FAST.X or ProtectPoint you may have an additional SRP in the config, the following command shows you what is available:
symcfg list –srp
Note the default SRP is set to be usable by RDFA DSE, this is normal. There is no need to configure a separate pool for DSE in VMAX3, we can reserve and cap some space from the default SRP for this purpose.

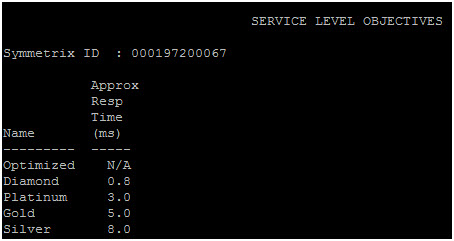
Viewing the Available SLO
symcfg list -slo
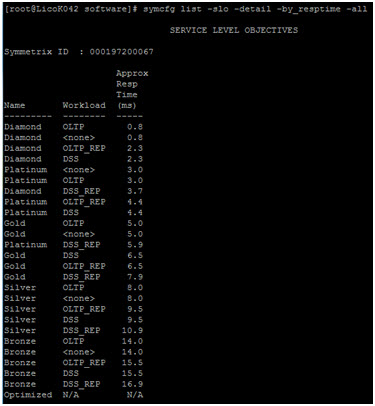
To get a more detailed look at the SLO’s and the workloads that can be associated with storage groups you can run the following command. The output shows the approximate response time for each.
symcfg list –slo –detail –by_resptime –all
SRP Capacity Consumption
In order to get an idea of how your storage is being consumed from the command line you can run the CMD:
symsg list –srp –demand –type slo
this will show you how your SRP is being consumed by each of the SLO, it will also list how much is consumed by DSE and Snapshot, remember this capacity all comes from your SRP so it’s worth keeping an eye on.

Listing SLO associations by Storage Group
The previous command gives us a good idea at a high level, but if we want to see from a storage group level which storage groups are associated with each SLO we have a command for that too:
Symsg list –by_SLO –detail
this shows each storage group and whether or not it is associated with an SLO, we also get some detail about the number of devices but we don’t see much regarding the capacity.

Additionally you can see consumption on an individual device level on the application storage group.

You can see the full breakdown of your SRP including drive pools and which SLO you have available as well as TDAT information. The output below shows all the thin devices (TDEVS) bound to the SRP and how much space they are each consuming.

Changing SLO On Existing Storage Groups
Changing Service Level Objective to Platinum and Workload to OLTP_REP for a storage group test:
symsg –sg test -sid 123 set –slo Platinum -wl OLTP_REP
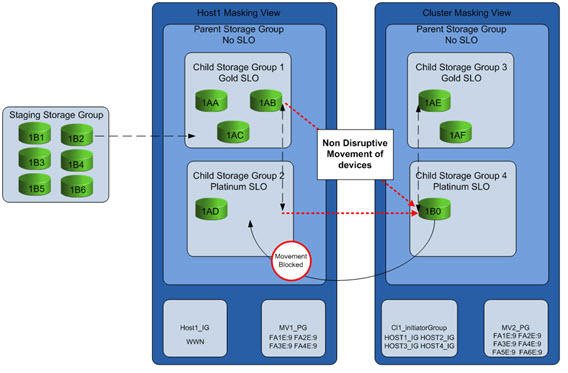
Solutions Enabler 8.X also allows for moving devices between groups non-disruptively
• Moving devices between child storage groups of a parent storage group when the masking view uses the parent group.
• Moving devices between storage groups when a view is on each storage group and both the initiator group (IG) and the port group (PG) elements are common to the views (initiators and ports from the source group must be present in the target).
• Moving devices from a storage group with no masking view or service level to one in a masking view. This is useful as you can now create devices and automatically add to storage group from CLI, so a staging group may exist. Command is:
symsg –test –sid 123 –sg staging_sg move dev 345 gold_sg
SnapVX – Space efficient Targetless Snapshots
I’m not going to go into the full details of SnapVX and what makes it revolutionary in the VMAX3, we have a very good technote that already covers this in detail. Needless to say, taking snapshots on VMAX3 is quicker, more efficient and easier than it has been on any previous generations. See the technote for full details.
Like most features in the VMAX to access the functionality simply put the word sym in front of the feature name. SnapVX is controlled with the symsnapvx command set. Really the only command you should need is symsnapvx –h, this will get you the full set of options. I’ll highlight a few of the main commands here.
Creating Snapshots
SnapVX is simplest when your storage has been designed with an application per storage group, you can still use device groups or files if you want but VMAX3 supports 64K storage groups, that is enough for one per application in most environments and means only managing a single entity for each application for provisioning as well as local replication and remote replication. You can snap multiple applications together using a cascaded storage group containing all of the child storage groups for each application. SnapVX snapshots are consistent by design so no need to specify any additional flags to obtain a point in time image of a live system.
To create a snapshot simply grab the storagegroup name which contains all the devices for your application and execute the establish command, the example below will create a snapshot hourly snapshot and will automatically terminate the same snapshot 24 hours after it was created:
symsnapvx –sg test–snapshotname hourlysnapshot establish –ttl –delta 1 –nop
You could run the command above in a cron job or batch file every hour and snapvx will create a new generation each time (gen 0).
Listing SnapVX Snapshots And Capacity Consumed
In order to see which storage groups are consuming the most space we can run the following cmd:
symcfg list –srp –demand –type sg
The output lists the storage groups showing their subscribed capacity (how much potential space they can consume) as well as their actual allocated capacity. A Particulary useful output here is the SnapShot Allocated (GB) Column, if you are in a bind for space you can quickly identify which storage group has consumed the most snapshot space and terminate some snapshots to return space to the SRP.
Note your storage group will only show up in this command output if it is FAST managed. Although everything in VMAX3 is under fast control it is possible to create storage groups that are not FAST managed for various use cases. A storage group is FAST managed if you explicitly specify the SRP and or assign an SLO. Shown below SourceSG1 has a large capacity of snapshot allocated storage.

To find out more about your snaps you can run the following cmd:
symsnapvx –sid –sg groupname list –detail
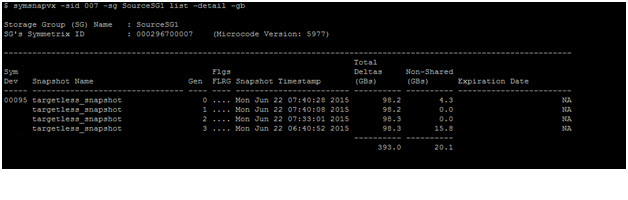
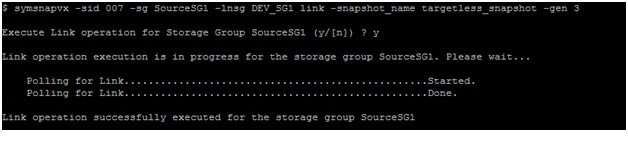
If I want to link off and access a snap I can use a storage group which I have pre-created with the same number of devices as the source/target devices can be same size or larger..
For deeper dive and more on the internals please see the Technote on EMC.com
https://www.emc.com/collateral/technical-documentation/h13697-emc-vmax3-local-replication.pdf
Useful Commands For Everyday Use!:
This information is at your finger tips with symcli -v
SYMCLI BASE Commands:
symapierr- Used to translate SYMAPI error code numbers into SYMAPI error messages.
symaudit – List records from a Symmetrix audit log file.
symbcv – Perform BCV support operations on Symmetrix BCV devices.
symcfg – Discover or display Symmetrix configuration information. Refresh the host’s Symmetrix database file or remove Symmetrix info from the file. Can also be used to view or release a ‘hanging’ Symmetrix exclusive lock.
symchg – Monitor changes to Symmetrix devices or to logical objects stored on Symmetrix devices.
symcli – Provides the version number and a brief description of the commands included in the Symmetrix Command Line
symdev – Perform operations on a device given the device’s Symmetrix name. Can also be used to view Symmetrix device locks.
symdg- Perform operations on a device group (dg).
symdisk – Display information about the disks within a Symmetrix.
symdrv – List DRV devices on a Symmetrix.
symevent – Monitor or inspect the history of events within a Symmetrix.
symhost – Display host configuration information and performance statistics.
syminq – Issues a SCSI Inquiry command on one or all devices. Interface.
symipsec – Administers IPSec encryption on Gigabit Ethernet connections.
symlabel – Perform label support operations on a Symmetrix device.
symlmf – Registers SYMAPI license keys.
sympd- Perform operations on a device given the device’s physical name.
symsg- Perform operations on a storage device group (sg).
symstat – Display statistics information about a Symmetrix, a Director, a device group, or a device.
symreturn- Used for supplying return codes in pre-action and post-action script files.
SYMCLI CONTROL Commands:
symaccess- Administer Symmetrix Access Logix. (Mapping and Masking of devices)
symacl – Administer Symmetrix access control information.
symauth – Administer Symmetrix user authorization information.
symcg- Perform operations on an composite group (cg).
symchksum- Administer checksum checks when an Oracle database writes data files on Symmetrix devices.
symclone – Perform Clone control operations on a device group or on a device within the device group.
symconfigure – Perform modifications on the Symmetrix configuration.
symconnect – Setup or Modify Symmetrix Connection Security functionality.
symfast – Administer Symmetrix FAST (Fully Automated Storage Tiering) policies, associations, and the FAST Controller.
symmask – Setup or Modify Symmetrix Device Masking functionality.(Older Symmetrix Pre 5977)
symmaskdb- Backup, Restore, Initialize or Show the contents of the device masking database. (Older Symmetrix Pre 5977)
symmigrate – Migrates the physical disk space associated with a Symmetrix device to a different data protection scheme, or to disks with different performance characteristics. (VMAX 10K/20K/40K)
symmir – Perform BCV control operations on a device group or on a device within the device group.
symoptmz – Perform Symmetrix Optimizer control operations.
symqos – Perform Quality of Service operations on Symmetrix Devices.
symrcopy – Perform Symmetrix Rcopy control operations on devices in a device file.
symrdf – Perform RDF control operations on a device group or on a device within the device group.
symrecover – Perform automated SRDF session recovery operations.
symreplicate – Perform automated, consistent replication of data given a pre-configured RDF/Timefinder setup.
symsan – List ports and LUNs visible on the SAN
symsnap – Perform Symmetrix Snap control operations on a device group or on devices in a device file.
symsnapvx- Perform Symmetrix Snapvx control operations.
symstar – Perform SRDF STAR management operations.
symtier – Create and manage storage tiers within a Symmetrix.
symtw- Manage time windows for the Optimizer, FAST and FAST VP controller within a Symmetrix. (VMAX 10K/20K/40K)
SYMCLI SRM(Mapping) Commands symhostfs- Display information about a host File, Directory, or host File System.
symioctl – Send IO control commands to a specified application.
symlv- Display information about a volume in Logical Volume Group (vg).
sympart – Display partition information about a host device.
symrdb – Display information about a third-party Relational Database.
symrslv – Display detailed Logical to Physical mapping information about a logical object stored on Symmetrix devices.
symvg- Display information about a Logical Volume Group (vg).


Hi David
Your Blog is really help full in configuring Vmax3 in our environment and We need a information regarding eNAS configuration.Hardware Setup how FAs will b used any related info
Your support is much appreciated
I would also like to see more information regarding online device expansions (no meta devices) for Hypermax. I have done this via Unisphere on the VMAX3, but I haven’t seen any examples of how to perform the same function via Solutions Enabler CLI.
symdev -sid zzz modify xxx -tdev -cap 1000 -captype gb
this will change your TDEV size to 1000
Thanks Paul