
The following are some configuration notes for configuring SMI-S to allow communication with the ‘VNX Storage Processors’, SMI-S can then be leveraged by for example VCE Vision or ViPR to configure/report on the VNX array. Before proceeding ensure you have the both VNX Storage Processor A&B IP addresses to hand, the SMI-S host will use these IP’s to allow for out-of-band communication over IP with the VNX. EMC SMI-S provider is included as part of ‘Solutions Enabler with SMIS’ install package which can be downloaded from ‘support.emc.com’.
Begin by installing SMI-S Provider, ensuring you select the ‘Array provider’ (Windows does not require Host provider) and chose the option for SMISPROVIDER_COMPONENT:

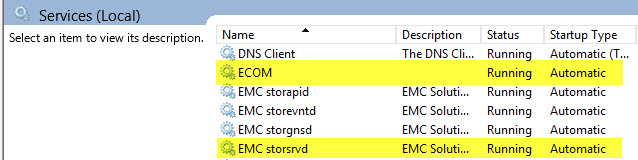
From the windows services.msc console check that both the ‘ECOM’ and ‘storsrvd’ services are set to automatic and in a running state:
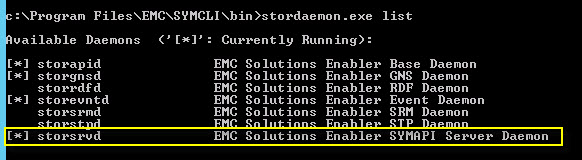
Check that EMC storsrvd daemon is installed and running from a Windows cmd prompt using stordaemon.exe:
stordaemon install storsrvd -autostart

stordaemon start storsrvd

stordaemon.exe list
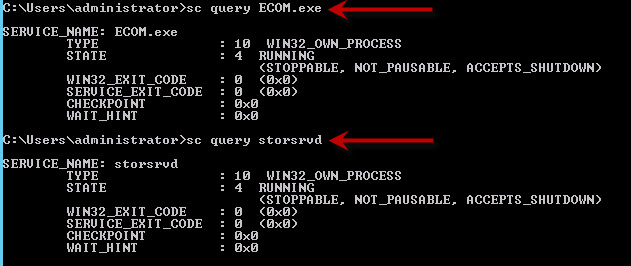
Or using the SC (service control) command you can query/start/config the ECOM and storsrvd services:
sc query ECOM.exe

sc query storsrvd

sc start ECOM.exe

sc start storsrvd

sc config ECOM.exe start=auto

sc config storsrvd start=auto
Run netstat -a and check the host is listening on ports 5988 5989:

UPDATE ENVIRONMENT VARIABLES:
Add the SYMCLI installation directory path (DRIVE:\Program Files\EMC\ECIM\ECOM\BIN) to the list of system paths:

Or use the windows CLI to add the SYMCLI and ECOM directories to the PATH environment variable:
setx /M PATH "%PATH%;C:\Program Files\EMC\SYMCLI\bin;C:\Program Files\EMC\ECIM\ECOM\bin"
If experiencing issues such as the ECOM service failing to start it is worth rebooting the mgmt server at this stage.
ECOM SERVER: ADD A NEW SMI-S Provider User
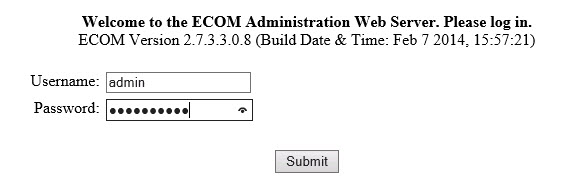
Provided all the validations are successful then proceed to login to the ECOM server and create the user you would like to use for (Vision/ViPR) connectivity:
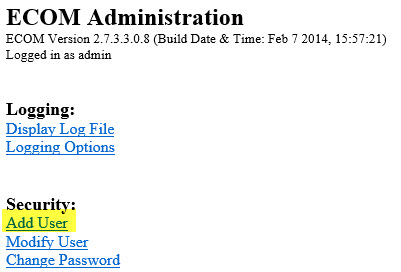
Open https://localhost:5989/ecomconfig
Login with default credentials of: admin / #1Password
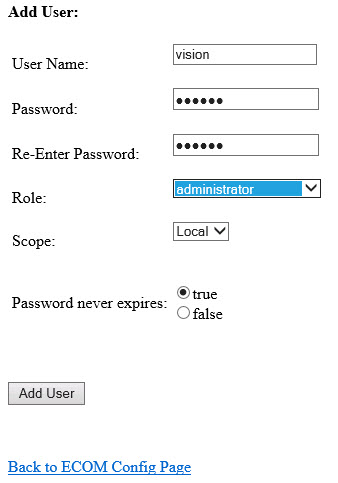
Select the option to add a new user and create the Vision user with administrator role and scope local:
Windows Firewall
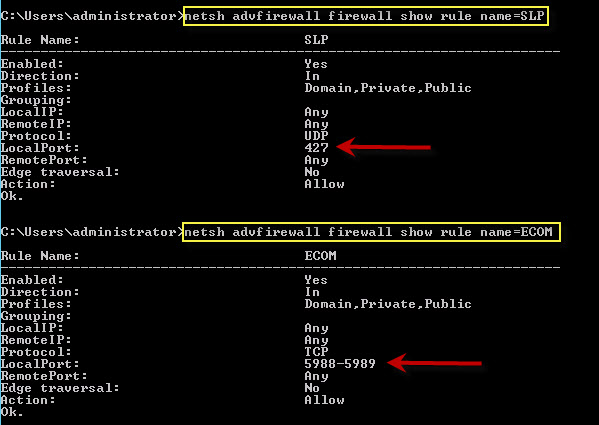
If the Windows firewall is enabled then rules will need to be created to allow ECOM ports TCP 5988&5989 and SLP port UDP 427. For example using the windows command line netsh to create rules for SLP and ECOM:
netsh advfirewall firewall add rule name="SLP" dir=in protocol=UDP localport=427 action=allow
netsh advfirewall firewall add rule name=”ECOM” dir=in protocol=TCP localport=5988-5989 action=allow
netsh advfirewall firewall show rule name=SLP

netsh advfirewall firewall show rule name=ECOM
Discover and Add the VNX using TestSMIProvider:
Confirm communication to the VNX from the SMI-S host by running the navicli getagent cmd on both VNX Storage Processors from the Element Manager cmd prompt:
naviseccli -h SPA-IP getagent
choose option 2 if prompted
naviseccli -h SPB-IP getagent
choose option 2 if prompted
Or using credentials:
naviseccli -h SPIP -user sysadmin -password sysadmin -scope 0 getagent
Open a Windows cmd prompt session as admin user, if the environment variable has not been set then you will need to ‘cd’ to ‘cd D:\Program Files\EMC\SYMCLI\bin‘
symcfg auth add -host SPA_IP -username sysuser -password syspw

symcfg auth add -host SPB_IP -username sysuser -password syspw
Create a text file, for example called SPIP.txt that contains the IP addresses for SP A&B. Then run the following commands to discover and list the VNX:
symcfg discover -clariion -file D:\spip.txt

symcfg list -clariion
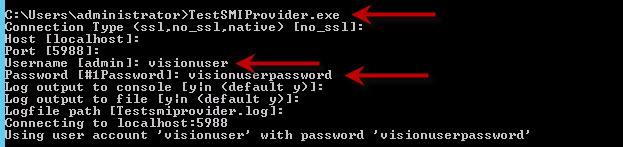
Again from a Windows cmd prompt session as admin user, if the environment variable has not been set then you will need to ‘cd’ to c:\Program Files\EMC\ECIM\ECOM\BIN. Type TestSMIProvider.exe at the prompt, from here chose all defaults except for the Vision user and password created through the ECOM console:
At the prompt type ‘addsys’ to confirm connectivity between the VNX Array and the SMI-S Host:
(localhost:5988) ? addsys

Add System {y|n} [n]: y
ArrayType (1=Clar, 2=Symm) [1]:
One or more IP address or Hostname or Array ID
Elements for Addresses
IP address or hostname or array id 0 (blank to quit): SPA_IP
IP address or hostname or array id 1 (blank to quit): SPB_IP
IP address or hostname or array id 2 (blank to quit):
Address types corresponding to addresses specified above.
(1=URL, 2=IP/Nodename, 3=Array ID)
Address Type (0) [default=2]:
Address Type (1) [default=2]:
User [null]: sysuser
Password [null]: syspw
++++ EMCAddSystem ++++
OUTPUT : 0
Legend:0=Success, 1=Not Supported, 2=Unknown, 3=Timeout, 4=Failed
5=Invalid Parameter
4096=Job Queued, 4097=Size Not Supported
Note: Not all above values apply to all methods – see MOF for the method.
System : //SPA_IP/root/emc:Clar_StorageSystem.CreationClassName=”Clar_Stora
geSystem”,Name=”CLARiiON+CKM00100000123″
In 12.468753 Seconds
Please press enter key to continue…
At the prompt type ‘dv‘ to confirm connectivity between the VNX and SMI-S Host:

For any troubleshooting please refer to: ‘C:\Program Files\EMC\ECIM\ECOM\log’
Note: When configuring VCE Vision please ensure to use the ‘SMI-S Host’ IP address for VNX Block entries in the Vblock.xml configuration file, the NAS portion of the VNX uses the Control Station IP addresses for communication which have ECOM configured by default.
How to remove VNX systems using SMI-S “remsys” command:
- Log into the SMI-S Provider server
- Open a command prompt (cmd).
- Change (cd) to C:\Program Files\EMC\ECIM\ECOM\bin
- Run TestSmiProvider.exe
- Enter ein
- Enter symm_StorageSystem
- Copy the line that specifies the VNX system you want to remove:
Clar_StorageSystem.CreationClassName=”Clar_StorageSystem”,Name=”CLARiiON+CKM001xxxxxxxx”
- Enter remsys
- Enter Y
- Paste the line specifying the VNX system you want to remove that you copied in the preceding step.
- Enter Y
- Run a dv command to confirm the VNX system has been removed.
Built with EMC SMI-S Provider: V4.6.2
Namespace: root/emc
repeat count: 1
(localhost:5988) ? remsys
Remove System {y|n} [n]: y
System’s ObjectPath[null]: Clar_StorageSystem.CreationClassName=”Clar_StorageSys
tem”,Name=”CLARiiON+CKM001xxxxxxxx“
About to delete system Clar_StorageSystem.CreationClassName=”Clar_StorageSystem”
,Name=”CLARiiON+CKM001xxxxxxxx“
Are you sure {y|n} [n]: y


Great Blog. Detailed step-by-step configuration. thanks david for your efforts
Thank you, glad it was helpful
Great Article , but i have one issue the ECOM.exe service keeps terminating. I mean when i start in auto it keeps stopping within seconds.
Any Idea?
Thanks
Matin
Hi Martin, what i find helps sometimes is to uninstall completely and delete any residual directories. Then reinstall after a reboot.
Hi David, Is there a way of fixing the port conflict with Cisco DCNM and ECOM? Finding it difficult to get the Cisco SMI-S Agent service started?
It starts then stops straight away.
Thanks
You can try the following, I meant to write up a post on this:
2.Stop the ECOM service found in the previous step that is using ports 5989 and 5988
3. Continue with the DCNM upgrade.
4. After DCNM has been upgraded, change the SMI-S default ports used by DCNM
a. Select Start -> Administrative Tools -> Services
b. Stop the Cisco SMI-S Agent service.
c. Create a file using “NOTEPAD” called cimxmlscpa.properties in the /dcm/smis/server/jserver/bin directory
1. Find an unused port for https (do NOT use the SMI-S default 5988 or 5989) and enter the following in the file:
HTTPSPort=
Example
HTTPSPort=5601
Save the file in the above directory path.
d. Create a file using “NOTEPAD” called cimxmlcpa.properties in the /dcm/smis/server/jserver/bin directory
1. Find an unused port for http (do NOT use the SMI-S default 5988 or 5989) and enter the following in the file:
HTTPPort= (without the brackets)
Example
HTTPPort=5600
Save the file in the above directory path.
e. Start the Cisco SMI-S Agent service.
5. Start the service that was stopped in step 2
Thank you for writing thiss