Storage
EMC VNX – Changing Storage Processor IP & NAME
This is a guideline on how to change the VNX Storage Processor IP and Name via Navicli. Navicli does not require a reboot of the SP after changing the SP […]
Virtualization & Storage

This is a guideline on how to change the VNX Storage Processor IP and Name via Navicli. Navicli does not require a reboot of the SP after changing the SP […]
This is a guideline on how to change the VNX Storage Processor IP and Name via Navicli. Navicli does not require a reboot of the SP after changing the SP IP address but does require a restart of the Management Server. Please note that a change of SP Name will require a reboot of the SP.
Note: if you are using the Setup Page (http:// SP_IP /setup/) to change either the SP IP or Name then a reboot of the SP will be required.
Ensure you address the following points before proceeding:
1. If the array to be changed is part of a storage domain, you must remove it from the domain before proceeding. If the array to be changed is the domain master, assign another array to that role before continuing. This can be done via Unisphere VNX Client.
2. If this is the only array in a storage domain, destroy the domain prior to changing the IP address. (Management server restart required)
3. Check that all hosts have dual-Fibre connectivity and that failover software is working correctly.
First before making a change take a look at the existing SP details:
naviseccli -h 192.168.101.40 networkadmin -get -sp a –ipv4

naviseccli -h 192.168.101.41 networkadmin -get -sp b –ipv4

Change SP_A IP:
naviseccli -h 192.168.101.40 -user sysadmin -password sysadmin -scope 0 networkadmin -set -ipv4 -address 10.236.66.71 -subnetmask 255.255.255.0 -gateway 10.236.66.1

Change SP_B IP:
naviseccli -h 192.168.101.41 -user sysadmin -password sysadmin -scope 0 networkadmin -set -ipv4 -address 10.236.66.72 -subnetmask 255.255.255.0 -gateway 10.236.66.1

Change DNS IP and Domain Entries:
Running this command on one SP is sufficient as it will sync the changes automatically with it’s peer SP.
naviseccli -h 10.236.66.71 -user sysadmin -password sysadmin -scope 0 networkadmin -dns -set -domain corp.local -nameserver 10.10.10.20 10.10.10.30
List DNS:
naviseccli -h 10.236.66.71 -user sysadmin -password sysadmin -scope 0 networkadmin -dns -list
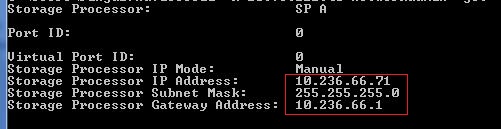
Now if we retrieve the IP details for both SP’s we can see the changes made:
SP_A:
naviseccli -h 192.168.101.40 networkadmin -get -sp a –ipv4
SP_B
naviseccli -h 192.168.101.41 networkadmin -get -sp b –ipv4

Next to change the Network name. Again please note this change will cause the SP to reboot:
Change SP_A Name:
naviseccli -h 10.236.66.71 -user sysadmin -password sysadmin -scope 0 networkadmin -set -name NewNameSPA

Change SP_B Name:
naviseccli -h 10.236.66.72 -user sysadmin -password sysadmin -scope 0 networkadmin -set -name NewNameSPB

Note:
Please refer to the VNX Procedure Generator for a detailed list of specific guidelines for completing this task.


I have to tell you this: I have gotten out of more pickles because of your articles than anyone else on this subject. I barely ever post anything on the internet, but I felt I had to leave you props and let you know how many of us you help.
Cheers,
-Garret
Hi David.
Thank you for your time, this article really help me to configure VNX5400 lab.
P.S.: I see you like CLI, check ConEmu 🙂
Regards,
Anton
Hi David,
Can same be deployed on VNX 5800?
Please advise.
BR.
Aamir
Yes
Hi David, Your Articles are amazing. Thanks a lot 🙂
I have a query, Can i remove my Control stations and Data Movers to use the VNX Unified as just VNX Block ?
There is no data on the array, can you please list the steps to re-configure the array?
Hi Ravi, thanks for the feedback. Sorry I do not have this procedure, I would advise you to contact support.
Great article, i was looking for this.
I have to change the iscsi IPs and SPs for a block device. I am going to follow your steps for SPs’s change.
I will appreciate if could put some steps to change the iscsi IPs.