Storage
EMC VMAX – Data Device (TDAT) Draining From A Thin Pool
Draining of a Data Device (TDAT) from a VMAX Thin Pool is a non-disruptive activity, meaning TDAT’s can be removed from a Thin Pool without the need to unbind any […]
Virtualization & Storage

Draining of a Data Device (TDAT) from a VMAX Thin Pool is a non-disruptive activity, meaning TDAT’s can be removed from a Thin Pool without the need to unbind any […]
Draining of a Data Device (TDAT) from a VMAX Thin Pool is a non-disruptive activity, meaning TDAT’s can be removed from a Thin Pool without the need to unbind any TDEV’s with allocated extent’s residing on the TDAT. There may be many reasons why you wish to perform such an action, in my case it was to re-allocate the TDAT’s to another Pool helping to reuse space in order to improve efficiency. Another example is where you may wish to replace a drive(s) with a newer model (higher capacity required) and you need to move off any Production data that resides on the existing drives in preparation for the replace operation.
The Draining and removal process is essentially a 3 phase operation:
1. Disabling the TDAT effectively initiates Draining on the device. Once the TDAT gets disabled within the Pool, used tracks on the device get moved to the remaining enabled devices in the Pool non-disruptively.
2. On completion of the Draining process the TDAT device enters a disabled state.
3. Once in a disbaled state the TDAT can be removed from the Thin Pool.
Performing the Drain Operation Via Unisphere
Navigating to Thin Pool ‘Boot-Pool’ the 8xTDAT volumes are displayed. The objective in this example is to demonstrate removing 25% of the devices (0903-0904). Fisrtly choosing volume 0904 and hitting the Disable Button:

This immediately places the volume into a Draining state and any Data present on the device is balanced across the remaining enabled TDAT’s (08FD-0903) within the Thin Pool:

The progress of the Drain is visible from Unisphere as the volume %used, GBused and GBfree are updated during the transition of the extents to other TDAT’s:

Once the data volume completes the Drain process and displays an Inactive state then it is safe to hit Remove.

Performing the Drain Operation Via Symcli
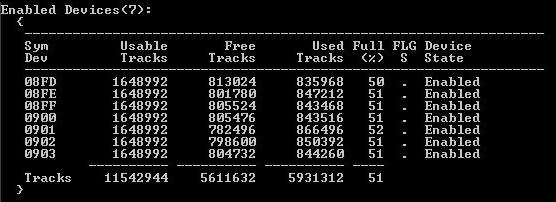
List details of the Thin Pool, providing data device information:
symcfg show -pool Boot-Pool -thin -all
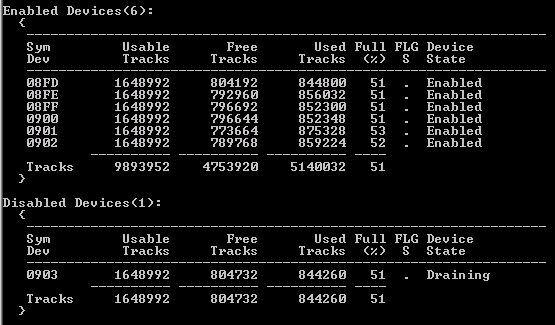
Use the symconfigure command Disabling the data device 0903:
symconfigure -cmd “disable dev 0903 in pool BOOT-Pool, type=thin;” commit
Again viewing the Pool detail using the symcfg show -pool command, we can monitor the progress of the Drain operation:
Removing the data device once the Drain operation is complete:
symconfigure -cmd “remove dev 0903 from pool BOOT-Pool, type=thin;” commit


David Your blog is very useful for us. And i have couple of doubts 1. In cisco mds 9513 switch how to verify the logs for particular interface (like i want to verify fc2/5 logs) 2. How to verify that FA port utilization is very high in vmax. Can you please send me the answers to bhaskar123.k@gmail.com………looking forward to your reply
Thanks for the really nice explanation for moving the TDATs to a different Pool.
Related to this I have another Question?
We got some loaner FC disks for few months to accommodate some application. NOw since we have purchased some more disk and needs to return back these loaner disks to EMC. We are wondering how should be accomplish this task? Since the TDATs sitting on those Loaner drives are part of a Pool. We are thinking of doing the vLUN migration to a new pool. But if the method you explained above, does it work for draining the TDATs to another TDATs in a different Pool?